If you have a handful of products to schedule, doing them one at a time in the Shopify admin is manageable. When you are preparing a seasonal launch with 30 products, running a category-wide sale, or scheduling an entire collection to go live at once, the one-by-one approach becomes a real problem.
Shopify gives you several ways to handle this at scale. There is no single-click "schedule everything" button, but between the bulk editor, CSV import, and Shopify Flow, you can get a large batch live without opening each product individually. This article covers each option so you can pick the right one for your situation.
What Shopify's Bulk Editor Can and Cannot Do
The Shopify bulk editor lets you edit multiple products at once in a table layout. You can access it by going to Products, selecting multiple products using the checkboxes, and clicking Edit products.
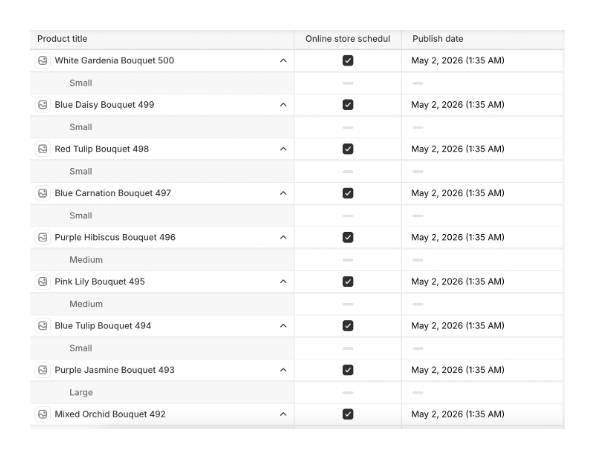
The bulk editor supports editing many product fields across rows simultaneously. For scheduling specifically, it can show an Online Store column and a scheduled publish date column if you add them using the Columns button at the top right.
This lets you set a publish date on multiple products within a single screen without opening each product individually. You click into the schedule field for each row and set the date. Once done, save the bulk edit.
The limitation is that you still need to click into each row's schedule field individually. The bulk editor does not let you set one date and apply it to all selected rows at once. It reduces navigation time significantly compared to opening each product, but it is not a true one-click bulk action.
The bulk editor also only handles scheduled publishing, not scheduled unpublishing. There is no unpublish date column available.
Scheduling Products in Bulk Using CSV
Shopify's product CSV export and import gives you more control than the bulk editor for large catalogs.
Export your products from the admin by going to Products and clicking Export. Choose the products you want to schedule and export as a CSV.
Open the CSV in a spreadsheet application. The column relevant to scheduling is called Published. Setting this to TRUE publishes the product immediately when imported. For future scheduling, there is also a Published At column where you can enter a future date and time in the format YYYY-MM-DD HH:MM:SS.
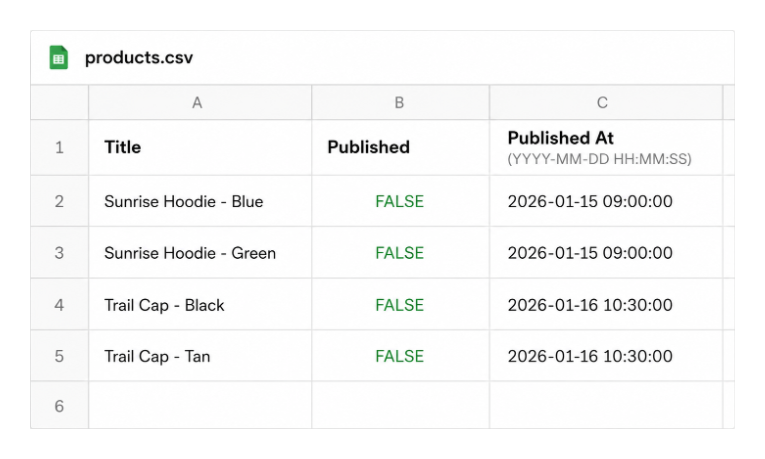
Set Published to FALSE and Published At to your intended future launch date and time for each product you want to schedule. Save the file and import it back into Shopify via Products and then Import.
Shopify will process the import and schedule each product to publish at the date and time you specified in the Published At column. You can set different dates for different products in the same import file, which makes this the most flexible native option for bulk scheduling.
Timezone note: The timezone used for the Published At column is your store's timezone as configured in Settings under Store details. Make sure the times you enter in the CSV reflect that timezone, not UTC or your local time.
This approach does not handle unpublishing. There is no Unpublish At column in Shopify's CSV format. The CSV import can only schedule the publish side.
Scheduling Collections in Bulk
Collections can also be scheduled for future publishing, but the process is more limited than products.
You can schedule a collection to publish by opening it in your Shopify admin, going to the Publishing section, clicking the calendar icon next to Online Store, and setting a date. But this can only be done one collection at a time. There is no bulk editor or CSV field that supports bulk collection scheduling.
When a collection is scheduled to publish, the products inside it are not affected by the collection's visibility schedule. Products that are individually published will still appear on their own product pages and in other collections even if the main collection is hidden. A collection schedule controls when the collection page itself becomes visible, not the visibility of the products it contains.
Scheduling a collection to unpublish is not available natively at all. You can only schedule a collection to publish. Removing a collection at a scheduled time requires Shopify Flow or an app.
Using Shopify Flow for Bulk Scheduling
Shopify Flow can run bulk publish and unpublish actions using the Scheduled time trigger combined with the Get product data action and a For each loop.
The workflow looks like this: set a Scheduled time trigger for your launch date and time. Add a Get product data action with a filter for a specific tag you have added to all products in the launch. Add a For each loop to iterate through the returned products. Inside the loop, add a Publish product action.
Before your launch, you tag all the products in the batch with a shared tag such as "launch-jan-2026." The Flow workflow fires at the scheduled time, finds all products with that tag, and publishes each one automatically.
For the unpublish side, build a second Flow workflow with the same structure but using the Unpublish product action, set to fire at your close time.
Flow is available on all Shopify plans at no additional cost. The Scheduled time trigger runs a maximum of once every 10 minutes, so exact-minute precision is not guaranteed, but for most launch scenarios the margin is acceptable.
The setup requires familiarity with Flow's interface. Each launch batch needs its own pair of workflows, or you need to edit and reactivate existing workflows before each launch. For teams that do bulk launches regularly, this overhead adds up.
Using an App for Bulk Scheduling
Apps built for product scheduling give you a purpose-built interface for managing multiple products across time windows without building Flow workflows manually or working with CSV files.
Schedora handles both publish and unpublish scheduling and lets you apply schedules to multiple products at once. If you are running regular launches with batches of products, having a dedicated scheduling interface removes the overhead of CSV preparation or Flow workflow management before each launch.
The right choice depends on how often you do bulk scheduling. A quarterly seasonal launch is manageable with the CSV approach. A weekly or monthly cadence of multiple batches is where a dedicated app pays for itself in time saved. If you are also planning to keep certain products out of your main catalog during a launch, the guide on excluding products from the All collection pairs well with this workflow.
Preparing Your Products Before a Bulk Launch
Critical: Regardless of which scheduling method you use, the products being scheduled must be in Active status before the scheduled time arrives. A product in Draft status will not publish even if a schedule is set.
Set up all product details, images, descriptions, and pricing before scheduling. Once the schedule fires, the product goes live as-is. Any last-minute edits made to an Active but not-yet-published product are reflected at launch.
Do not leave products in Draft with the intention of making them Active right before launch. If something delays that step, your launch fails silently. Get everything Active early and let the scheduling handle the timing.
Checking That Your Bulk Schedule Worked
After setting up a bulk schedule, verify it before walking away.
For the CSV method, go back to a few of the scheduled products and check that the scheduled date appears correctly in the Sales channels section. Open the product, look at Online Store in the Sales channels and apps section, and confirm the schedule date shows.
For Flow, test the workflow on a single dummy product before applying it to your full launch batch. Flow has a test mode that lets you verify the workflow logic without it affecting live products.
After your launch fires, open your storefront in an incognito browser window and confirm the products are visible. Check a few product URLs directly rather than relying only on collection pages, since collection visibility and product visibility are independent of each other.
If you are scheduling a single product with a start and end date rather than a batch, the article on scheduling product availability in Shopify covers that workflow. For inventory-triggered hiding rather than time-based scheduling, automatically hiding out-of-stock products is the relevant starting point.