Shopify has a built-in future publishing feature that lets you set a date and time for a product to go live on your store. It works reliably and requires no extra setup. For many merchants, that is all they need.
For others, scheduling is a two-sided problem: a product needs to go live on Friday and come down on Sunday. A sale item should appear at midnight and disappear after 48 hours. A limited release is available for exactly one week.
That second side, the automatic close, requires a bit more work. This article covers exactly what Shopify does natively, the specific conditions that must be met for it to work, why it sometimes fails, and what your options are for adding an end date.
What Shopify's Native Scheduling Actually Does
Shopify calls this feature future publishing. It lets you set a future date and time for a product to become visible on your Online Store sales channel. Once the scheduled time passes, Shopify publishes the product automatically without you needing to be at your computer.
You can also schedule future publishing for collections, blog posts, and pages through the same interface. That makes scheduled publishing useful for a New Arrivals collection that updates automatically on a Shopify homepage, because newly published products can move into the collection without manually editing the section.
What it does not do:
It cannot schedule a product to unpublish at a future time
It does not work for the Shop app sales channel
It does not work for POS or the Buy Button channel
It cannot schedule price changes, tag changes, or any other product field changes
It has no bulk scheduling interface built in
The Key Requirement for Future Publishing
Critical requirement: For future publishing to work, the product must be set to Active status before the scheduled time arrives. If the product is in Draft status when the scheduled publish time hits, nothing happens — the product stays hidden and Shopify does not automatically change its status.
The workflow Shopify expects is: set the product to Active, then schedule its Online Store visibility for a future date. Active and published are two different things in Shopify. Active means the product exists and can be sold. Published to Online Store means it is visible on your storefront.
When you schedule a future publish date on an Active product, the product remains invisible on your storefront until that date arrives. When the date arrives, it becomes visible. The product itself never changes status. Only its visibility on the Online Store channel changes.
How to Schedule a Product to Publish
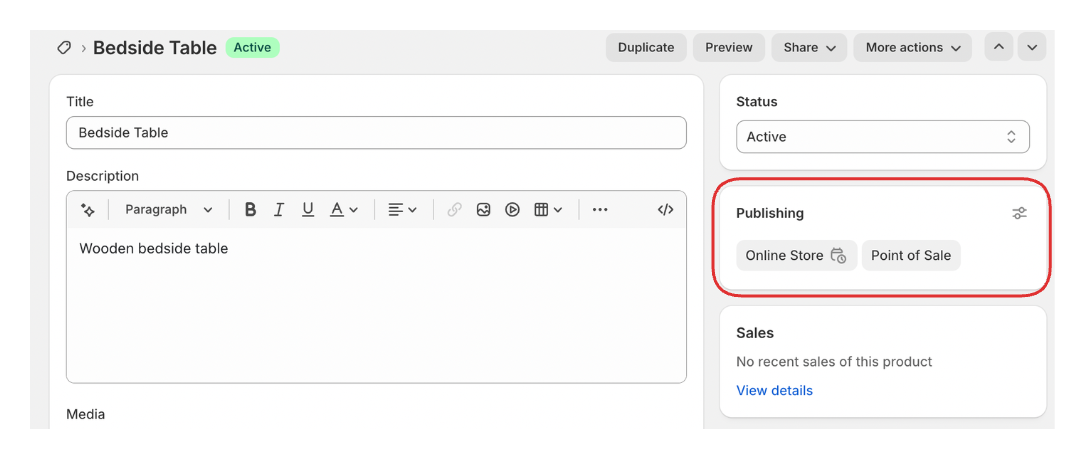
Go to your Shopify admin and open the product you want to schedule. Make sure the Status field at the top of the page is set to Active.
Scroll down to the Sales channels and apps section. You will see Online Store listed there. Click the calendar icon next to Online Store.
A date and time picker appears. Choose the date and time you want the product to go live. Shopify defaults to the next half-hour mark in your store's timezone, but you can type any valid hour and minute. Click Schedule publishing, then click Save.
The product now shows as scheduled in the Sales channels section. It will not be visible on your storefront until the time you set.
To check, edit, or cancel a scheduled publish, go back to the product and click on Online Store in the Sales channels section. You will see the scheduled date and can edit it with the pencil icon or delete it with the trash icon.
Timezone: Where Scheduling Goes Wrong
Timezone reminder: Shopify uses your store's timezone when displaying and processing scheduled publish times. The admin interface shows times in your store's configured timezone, not your browser's local timezone.
If your store timezone is set to one region but you are physically located in another, the time you see in the scheduler reflects your store's timezone setting, not where you are sitting. This is a common source of confusion for merchants who set up a store in one country and later moved, or who manage stores across regions.
To check your store timezone, go to Settings, then Store details. The timezone is listed in the Standards and formats section. Make sure it matches where your customers are or where you expect the launch to matter. If you change the timezone setting, any scheduled publish times you have already set will shift accordingly, so check existing schedules after making a timezone change.
Adding an End Date: Your Options
Shopify's native scheduling covers the publish side. For the unpublish side, there are three practical approaches.
Shopify Flow. Flow is Shopify's built-in automation tool, available on all plans. You can use the Scheduled time trigger in Flow to run a workflow at a specific future date and time. That workflow can use the Get product data action with a tag or ID filter to find the relevant product, then use the Unpublish product action to remove it from your Online Store.
This works, but it requires setting up a separate Flow workflow for each unpublish event. The workflow has to be created, activated, and then deactivated or deleted after it runs. For a one-off situation it is manageable. For regular or recurring scheduling it becomes tedious.
Manual monitoring. For infrequent situations, setting a calendar reminder to manually unpublish a product at the right time is a valid approach, especially if you only do this once or twice a year.
Scheduling Collections
Shopify also supports future publishing for collections. The process is the same: go to the collection, find the Publishing section, click the calendar icon next to Online Store, set a date and time, and save.
The same limitation applies. You can schedule a collection to publish but you cannot schedule it to unpublish. If you want a collection to disappear at a specific time, you need Flow or an app to handle that.
One thing worth noting: when a collection is unpublished, the products inside it are not affected. They remain Active and visible if they are published individually. Unpublishing a collection only hides the collection page itself, not the products it contains.
Why Your Scheduled Product Did Not Go Live
If you set a schedule and the product did not appear at the right time, work through this list:
The most likely cause is Draft status. Open the product and check that Status is set to Active, not Draft.
The second most likely cause is a timezone mismatch. Check your store's timezone in Settings and compare it to the time you thought you were scheduling for.
If the product page shows no scheduled date even though you set one, you may have forgotten to click Save after scheduling. Shopify requires you to save the product after setting the publish schedule.
If the product appeared but not on all your sales channels, that is expected behaviour. The schedule only applies to the specific channel you set it for. Each channel has its own scheduling control.
When Native Scheduling Is Enough
Shopify's built-in future publishing covers straightforward cases well. If you are launching a new product at a specific time and do not need it to come down automatically, the native feature handles it cleanly with no extra setup.
Where it falls short is any situation involving an end date, recurring windows, bulk scheduling across many products, or scheduling changes other than visibility. For those cases you are looking at Flow or a dedicated scheduling app.
If you are scheduling a limited-time sale and want customers to see the original price crossed out during the window, pairing scheduling with a compare at price on the product makes the discount visually obvious without any extra effort.
Seasonal gift box launches are a common use case for this combination — if you are building a gift box store, the article on setting up custom gift box options in Shopify covers how to structure those products before you schedule them.
If your specific need is running a limited-time release with a hard close, the article on timed product drops covers that workflow in detail.
If you need to schedule many products at once rather than one at a time, see how to bulk schedule products in Shopify. And if you want products to disappear automatically when they sell out rather than at a specific time, hiding out-of-stock products automatically covers that separately.