The most common approach merchants use for a weekly deals section is the one you are already thinking about: change the price, set a compare at price to show the original, add a tag, and link a collection to that tag. This works and it is the right foundation. But there are a few details about how each piece behaves in Shopify that are worth understanding before you build the system, so you do not hit surprises mid-promotion.
This guide covers the complete workflow: how to structure the deals collection, how compare at price actually works, how to pair it with an automatic discount if you want one, and how to make the whole thing repeatable week after week.
The Three Tools You Are Working With
Shopify gives you two separate ways to show a discount to customers, and they are completely independent of each other.
Compare at price is a display field on a product. You set the original price there and lower the actual Price field. Shopify shows the original price crossed out on the product page. This is purely visual. It does not affect what the customer pays at checkout, it does not require a discount code, and it does not interact with Shopify's discount system at all.
Automatic discounts are applied at checkout. They reduce what the customer pays based on rules you define. They appear as a line in the cart summary. They have no visual effect on product pages unless a third-party app is involved.
Tags and automated collections are how you group the products for the deals section and display them in one place.
For a weekly deals section, most merchants use compare at price alone. It is simpler, it shows savings on the product card in collection views (depending on your theme), and it requires no discount configuration. You can add an automatic discount on top if you want checkout-level confirmation, but it is not required.
Step 1: Tag Your Deal Products
Decide on a tag to use for all weekly deal products. Something like weekly-deal or on-sale works well. Keep it consistent because this tag is what drives the collection automatically.
Go to each product you want to include in this week's deals. Open the product in your Shopify admin, scroll to the Tags field, and add your tag. Save.
For the next week's rotation, you will remove this tag from last week's products and add it to new ones. That single tag change is all it takes to swap out the deals section.
Step 2: Create the Deals Collection
Go to Products, then Collections, and click Create collection. Name it something customer-facing like Weekly Deals or This Week's Offers.
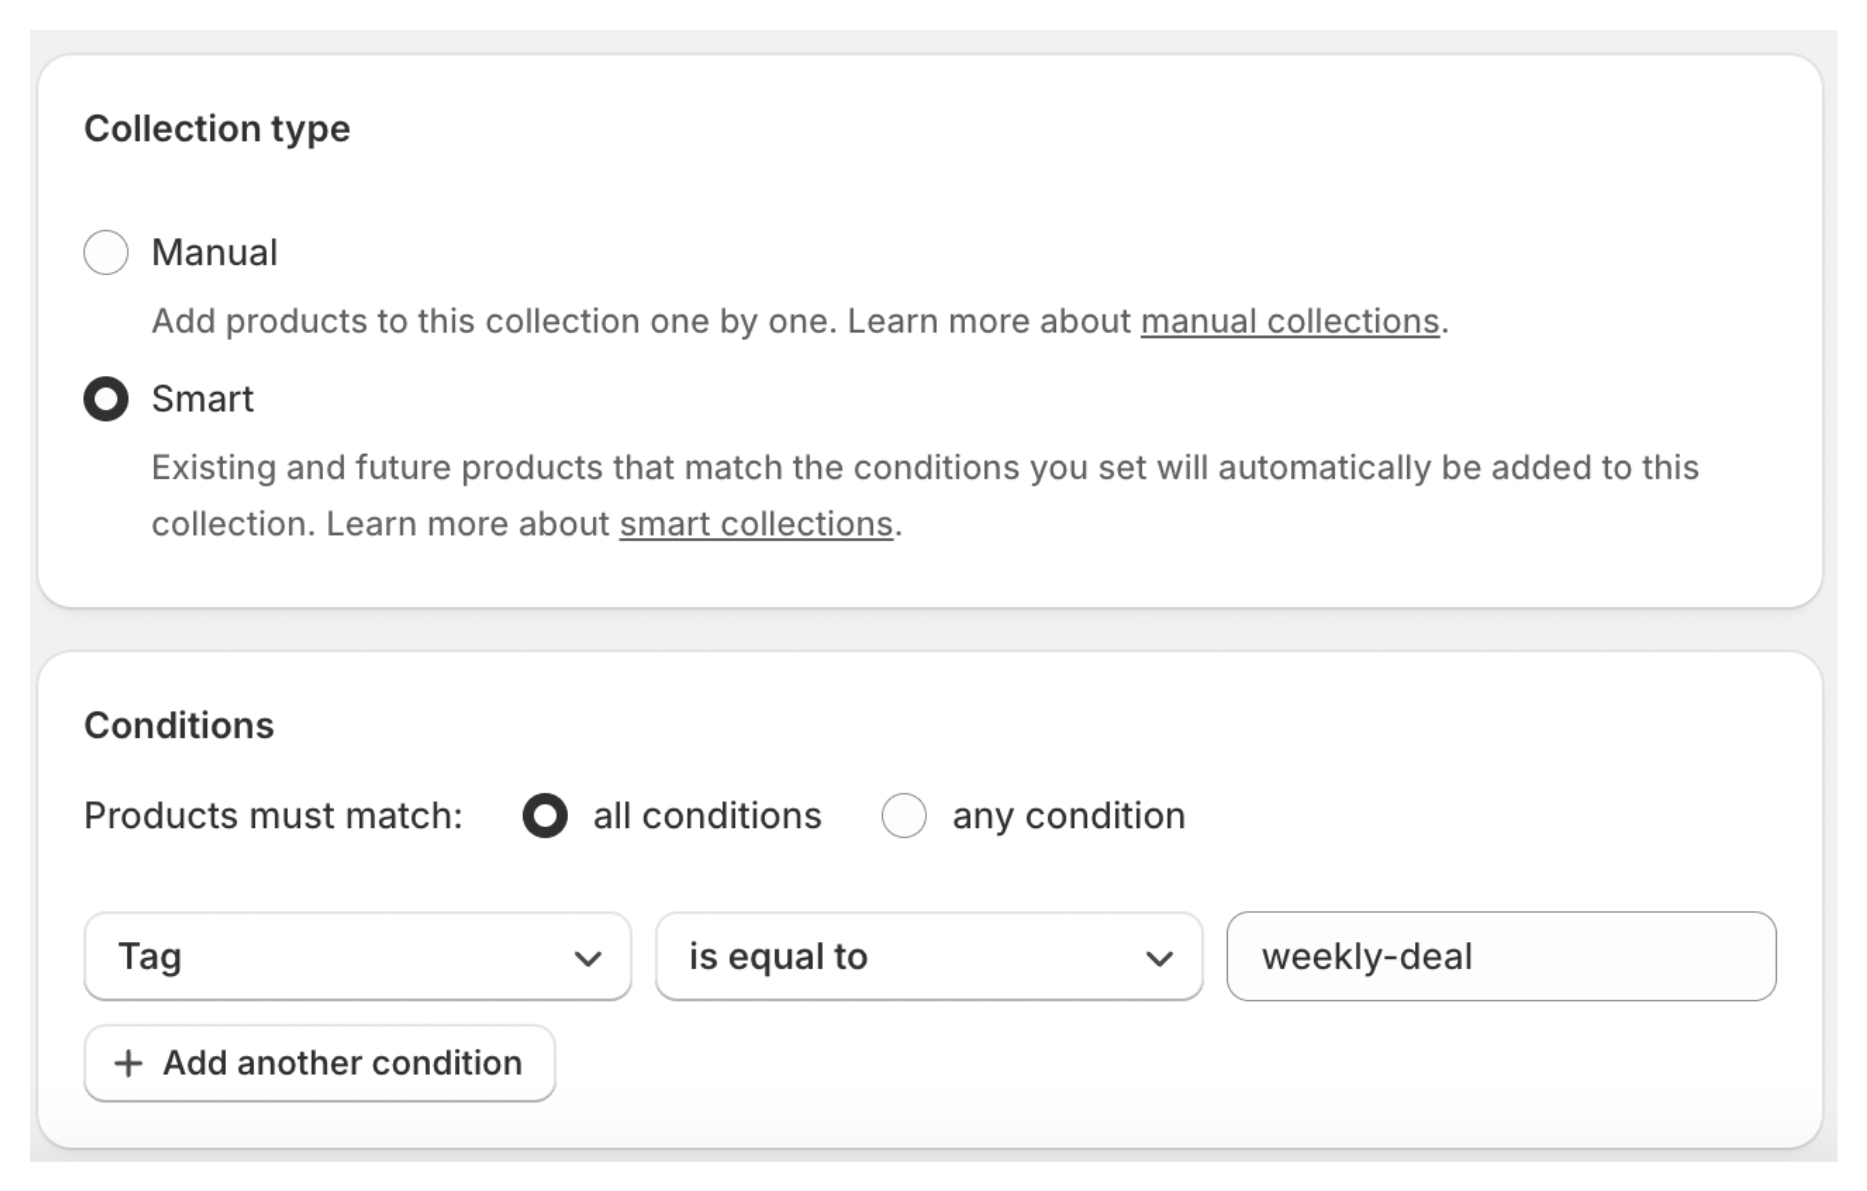
Under Collection type, select Automated.
Set the condition to: Product tag is equal to weekly-deal (or whatever tag you chose).
Save the collection. Every product with that tag now appears in this collection automatically. Removing the tag removes it from the collection. No manual product management needed.
If you want the collection to be accessible from your navigation, add it to your menu via Online Store, then Navigation. If you want a deals banner or section on your homepage, you can connect this collection to a Featured collection section in your theme editor the same way you would for any other collection.
Step 3: Set the Compare at Price
For each product in the deal, you need to set two things: a lower Price and a Compare at price showing the original.
Open the product. In the Pricing section, enter the sale price in the Price field. Enter the original price in the Compare at price field.
The compare at price must be higher than the current price. If the compare at price is equal to or lower than the price, Shopify will not display it. There is no error message — it simply does not show.
For products with variants (different sizes, colours, etc.), the compare at price must be set on each variant individually. It does not inherit from the main product level. Open each variant and set both fields there.
Once saved, the product page will show the original price crossed out next to the sale price. Most themes also display a percentage saved badge or an amount saved label automatically. This is what shows the customer the deal at a glance, both on the product page and on collection cards.

Theme behaviour: Whether the compare at price shows on collection cards (not just the product page) depends on your theme. Most current Shopify themes show it in both places. If you are only seeing it on the product page and not in collection view, check your theme settings or the collection product card template.
Step 4: Optionally Add an Automatic Discount
Compare at price handles the visual presentation of the deal. If you also want the discount to apply automatically at checkout without customers needing a code, you can create an automatic discount alongside it.
Go to Discounts in your Shopify admin and click Create discount. Choose Amount off products.
Under Method, select Automatic discount. Give it a name you will recognise, like Weekly Deal - 20% off.
Set the discount value to the percentage or fixed amount. Under Applies to, select Specific collections and choose your Weekly Deals collection. This limits the discount to only the tagged products in the deal.
Set active dates matching your deals window. At the end of the week when you rotate products, update or deactivate the discount alongside the tag changes.
When to use an automatic discount vs compare at price alone: If your deal is a clean round percentage (20% off, 30% off), compare at price alone communicates this clearly on the product page. An automatic discount adds a confirmation line at checkout that reassures customers the price they saw is the price they pay. For deals where the discount amount varies per product, compare at price on each individual product is the more accurate signal.
Note that Shopify's automatic discount applies to the cart subtotal and shows as a separate line in the order summary. It does not update the price shown on the product page or collection card. If you use both compare at price and an automatic discount for the same product, make sure the numbers are consistent. A product showing 25% off via compare at price but receiving a 20% automatic discount at checkout creates a confusing customer experience.
The Weekly Rotation Workflow
Once the system is in place, rotating deals each week takes a few minutes.
Go through last week's deal products and do two things for each: remove the weekly-deal tag, and clear the compare at price field (set it back to blank). This restores the product to its normal price display and removes it from the deals collection simultaneously.
Then go through this week's deal products and add the tag and set the new compare at price. They enter the collection immediately.
If you set an automatic discount with specific active dates, update those dates or deactivate the old one and create the new one.
That is the full rotation. Tag management is the operational core of the system.
Bulk editing tip: If you have several products to update at once, Shopify's bulk editor helps. Go to Products, select your deal products, click Edit products, and add the Compare at price column from the Columns selector. You can update compare at prices for multiple products in one table view without opening each individually.
Adding the Deals Section to Your Homepage
If you want a deals section directly on your homepage rather than just a collection page, connect the Weekly Deals collection to a Featured collection section in the theme editor.
Go to Online Store, then Themes. Click Customize. On the homepage, find or add a Featured collection section. Select your Weekly Deals collection. Set the number of products to show — four to six is typical for a homepage row.
Because the collection is automated and tag-driven, the homepage section updates automatically when you rotate the tags. You never need to touch the theme editor to swap in new deals.
What to Watch Out For
Removing the compare at price. When a promotion ends, clear the compare at price field on each product. If you only change the price back but leave the compare at price in place, the product will show the new price as a sale against a compare at price that is now lower. Shopify will not show it if it is lower, but leaving stale compare at price data in your products creates confusion when you run future promotions.
Variant pricing consistency. If a product has variants at different price points, set the compare at price on every variant. A product where only some variants show a sale price and others do not looks unfinished.
Deal products that sell out mid-week. If a deal item sells out during the promotion, the product will still appear in your Weekly Deals collection with a sold-out state. If that creates a poor browsing experience, you can set up Shopify Flow to automatically hide products when they go out of stock so the collection only ever shows items customers can actually buy.
If you plan to restock deal products using purchase orders, the article on how Shopify purchase orders and incoming inventory work covers how to track what is already on order before stock arrives.
Price change vs discount. Changing the price and setting a compare at price is a genuine price reduction. The customer pays the lower price unconditionally. An automatic discount is applied at checkout based on rules. Both approaches are legitimate but behave differently. For a simple weekly deals section, price reduction plus compare at price is the cleaner and more visible approach.
For more on how compare at price works in detail, including how to update it across a large catalog using CSV, see the guide on showing compare at price on your Shopify product page. If you want to run deals that automatically go live and come down at specific times without manual tag changes, scheduling product availability in Shopify combined with Schedora covers that workflow. And if you want to reward customers who buy more during the deals period, tiered discounts layer on top of this system cleanly.
If you are running a larger seasonal promotion rather than a regular weekly rotation, the guide on preventing overselling during a Shopify seasonal sale covers stock buffers, multi-channel inventory settings, and how to prepare for a high-traffic event without inventory surprises.
For rewarding individual customers outside of your broader deals structure — for example, someone who left a review or referred a friend — the guide on sending a discount to a specific customer in Shopify covers how to do it without creating a full segment.