When a customer selects a color on your product page, you want the images to switch automatically to show only that color. It is a basic expectation for any store selling products with visual differences between variants.
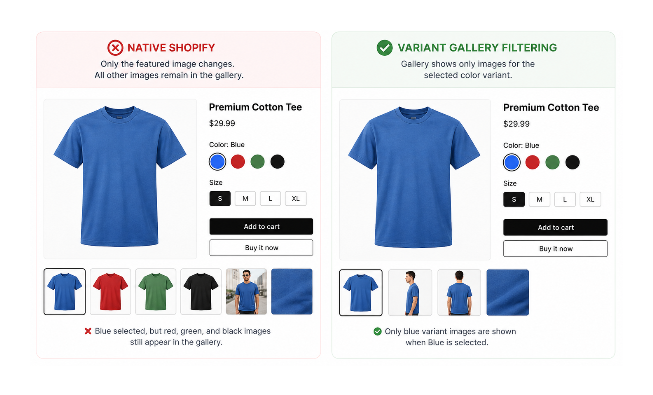
Shopify supports this, but with a distinction worth understanding before you start: natively, you can assign one featured image to each variant. Selecting that variant updates the featured image at the top of the gallery, but it does not automatically filter the rest of the gallery to show only that color's images.
For many stores, one featured image per color is enough. For stores where each color has multiple angles, lifestyle shots, or detail views, filtering the entire gallery by variant requires either a theme that supports it or a third-party app. Shopify Plus merchants also have access to the Combined Listings app as another option, covered below.
This article covers all three approaches so you can pick the one that fits your setup.
Which Approach Fits Your Situation
| Method | Multiple Images Per Variant | Works on Any Theme | Requires App |
|---|---|---|---|
| Native variant image | No | Yes | No |
| Theme alt text grouping | Yes | No | No |
| Third-party app | Yes | Yes | Yes |
The Native Method: One Featured Image Per Variant
Shopify's built-in variant image feature lets you assign a single image to each variant. When a customer selects that variant, the assigned image jumps to the front of the gallery as the featured image. The rest of the gallery remains visible and unchanged.
To set this up, go to Products in your Shopify admin and open the product you want to edit. Scroll down to the Variants section. Next to each variant, you will see a small image icon. Click it.
A panel opens showing your existing product images. Select the image you want to associate with that variant, click Done, then Save. Repeat for every variant.
Once saved, selecting a color on the product page makes that variant's assigned image appear as the main featured image.
Every variant needs an assigned image for this to work consistently. If some variants have an assigned image and others do not, those unassigned variants will not update the featured image when selected. Go through every color variant and confirm each one has an image assigned before testing on the storefront.
Assigning Images to Multiple Variants at Once
If you have many variants, assigning images one at a time is slow. Shopify's bulk editor handles this more efficiently.
In the Variants section of the product page, select multiple variants using the checkboxes on the left side. Click the three-dot menu that appears, then click Edit images or Add images. Select the relevant image from your product gallery and apply it across all selected variants at once.
This is useful when multiple size variants share the same color image. Select all sizes of Forest Green, assign the green image once, and all of them update simultaneously.
The Alt Text Method: Multiple Images Per Variant (Theme Dependent)
Some premium Shopify themes include custom JavaScript that reads image alt text and filters the gallery based on predefined naming conventions. Because this behaviour is implemented by the theme rather than Shopify itself, it is not available in all themes and the required syntax differs between them.
The way this works: you add alt text to each image using a specific format that tells the theme which variant the image belongs to. When a customer selects Blue, the theme reads the alt text of all product images, finds the ones tagged for Blue, and shows only those in the gallery.
A common format used by several themes is the option name followed by the variant value, separated by a colon. For a product with a Color option and a Blue variant, the alt text on each blue image would be Color: Blue. Some themes use a different separator or require the exact option name and variant name as entered in your Shopify product settings. Check your theme's documentation for the exact syntax before setting this up.
For the alt text article link that covers what to write for color variant images from an SEO perspective, see alt text for color variant images in Shopify. The alt text syntax your theme requires may conflict with what works best for Google Images, and that article covers how to handle both.
This method is not a Shopify native feature. Using the wrong syntax means images will not group correctly and may not switch at all. Always check your specific theme's documentation before setting this up, and test every color variant on the storefront after making changes.
The advantage of this approach is that it allows multiple images per variant and requires no app. The disadvantage is that it depends entirely on your theme supporting it, the syntax must be exact, and alt text written for theme functionality may not be optimised for search.
The App Approach: Full Gallery Filtering for All Themes
For full gallery filtering that works on any theme and supports multiple images, videos, and other product media per variant without relying on alt text conventions, a third-party app is the reliable route.
Apps built for this purpose let you assign multiple images to each variant from a dedicated interface. When a customer selects a color, the gallery instantly filters to show only that variant's media. No partial workarounds, no alt text syntax to manage, no dependence on theme support.
When evaluating apps for this, confirm that the app works with your current theme without code conflicts, supports the media types you need (photos only, or also videos and 3D models), and updates the gallery instantly on variant selection without a page reload or visible delay.
Shopify Plus and Enterprise merchants have access to the Combined Listings app, which is designed primarily for grouping separate products into a single product listing. If your variant gallery needs go beyond what the native method supports and you are on Plus, check whether Combined Listings fits your specific setup. For merchants on standard plans, third-party apps from the App Store handle variant gallery filtering directly.
Testing That Variant Images Are Working
After setting up any of these methods, test on the actual storefront before assuming it is working correctly.
Open the product page and select each color in turn. The assigned image should appear as the featured image immediately on selection. Also check:
- Test in an incognito window to rule out cached behaviour affecting what you see
- Test on mobile, as image switching can differ between desktop and mobile depending on how the theme handles touch interactions
- Test out-of-stock or unavailable variants, which sometimes behave differently from available ones
- If you have video media assigned to variants, confirm those switch correctly alongside images
- Test on products with many variants, not just two or three, as gallery behaviour sometimes changes with larger variant sets
If images are assigned correctly but not switching, the most common causes are: the Save button was not clicked after assigning variant images, the theme does not support dynamic variant image switching, or a conflicting app is overriding the gallery behaviour.
Keeping Variant Images Consistent Across the Catalog
For stores with many products and color variants, variant image management becomes an ongoing task every time new inventory is added.
Upload all images for a product before assigning them to variants. Assigning a variant image and then replacing it with a better version later requires going back to reassign. Getting all images finalised first means one pass through the variant assignments.
Use a consistent file naming system. If your image files are named by color (red-front.jpg, red-back.jpg, blue-front.jpg, blue-back.jpg), it is much easier to identify which images belong to which variant during assignments. This also helps if you use the alt text grouping method, since filenames give you a visual cue before you open the alt text field.
Make sure every variant image uses the same aspect ratio and dimensions as the rest of your product gallery. A variant image that is square when all other images are portrait will appear at a different size when customers switch between colors. The article on Shopify product image sizes and aspect ratios covers how to keep dimensions consistent across a catalog.
Once variant images are uploaded, add descriptive alt text to each one for search indexing. The article on alt text for color variant images covers what to write and how to handle similar descriptions across multiple color options without hurting SEO.
Choosing the Right Method
For most stores, assigning one featured image per variant through the native method takes only a few minutes and is enough. Customers see the right color when they make their selection, even if the full gallery does not filter.
If every color has multiple product photos and you want the entire gallery to update on selection, check whether your theme supports alt text grouping before reaching for an app. If it does, that is the lowest-cost path. If it does not, a dedicated app is the most reliable option and avoids the syntax constraints of the alt text approach.
Whichever method you use, test every variant on both desktop and mobile before publishing. Gallery switching behaviour is one of those things that looks fine in the admin and breaks in a specific browser or device combination more often than most other product page features.