How to Sync Shopify Inventory to Google Sheets (Step by Step)
If you manage inventory on Shopify, there comes a point where the built-in reports are not enough. You want your product data in Google Sheets so you can build forecasts, run custom formulas, create pivot tables, or share a live view with someone who does not have Shopify access.
The problem is that Shopify does not connect to Google Sheets natively. There is no built-in export that updates automatically. You can export a CSV manually, but that goes stale the moment you download it.
This guide covers how to set up a real, automated sync between Shopify and Google Sheets without writing any code. It also covers what data you can bring across, how to keep it refreshing on a schedule, and what your options are if you need something more advanced.
What "Syncing" Actually Means Here
When most merchants say they want to sync Shopify inventory to Google Sheets, they usually mean one of two things:
The first is a one-way push: Shopify data flows into Google Sheets on a schedule. Every few hours or once a day, the sheet clears and repopulates with fresh inventory data. You use Sheets as a read-only reporting layer.
The second is a two-way sync: changes made in Google Sheets flow back into Shopify. You update a stock level in the spreadsheet and Shopify reflects it. This is more complex and covered separately at the end of this article.
The method below handles the first case, which is what most merchants actually need.
The Tool You Need: Make
Make (formerly Integromat) is a no-code automation platform that connects apps together. It has native modules for both Shopify and Google Sheets, which means you can build the connection visually without writing API calls or scripts.
Make has a free plan that covers basic automations with limited monthly operations. For a simple daily inventory sync of a few hundred products, the free plan is usually enough. If you have a large catalog or want to sync every 15 minutes, you will need a paid plan.
Step 1: Set Up Your Google Sheet
Before building the automation, create the spreadsheet you want to populate.
Open Google Sheets and create a new sheet. In the first row, add the column headers for the data you want to track. A typical inventory sheet might include:
Product Title
Variant Title
SKU
Barcode
Price
Inventory Quantity
Inventory Policy (whether Shopify continues selling when out of stock)
Save this file somewhere in Google Drive. You will select it when building the Make scenario.
The first row is your header row. The automation will write data starting from row 2, so keep row 1 clean and do not put data there.

Step 2: Clear Old Data Before Each Sync
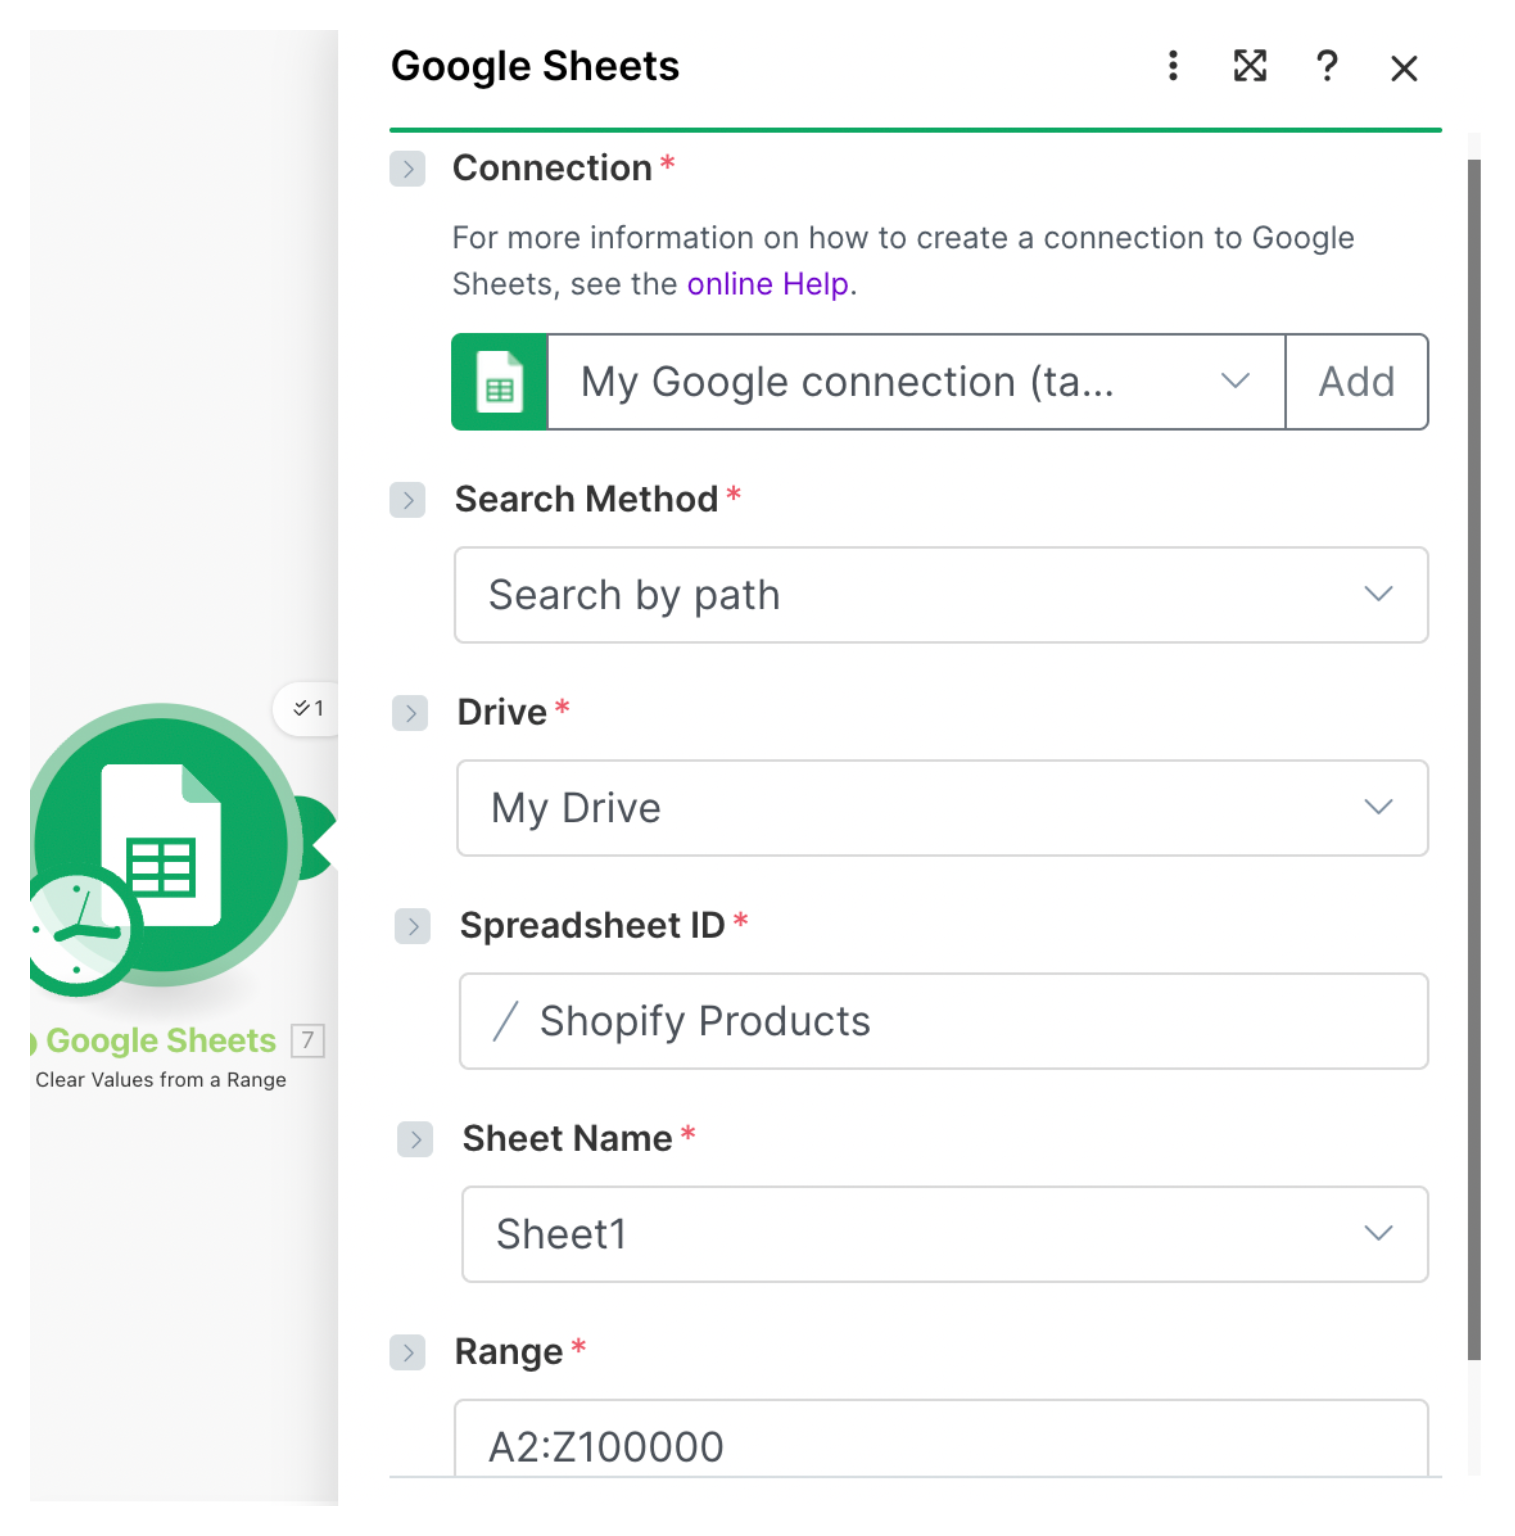
In Make, create a new scenario. The first module should be a Google Sheets action called Clear values from a range.
Connect your Google account when prompted, then select the spreadsheet and sheet tab you created. Set the range to A2:Z1000000. This clears everything below your header row before each run, so the sheet is always a clean snapshot of current inventory rather than an accumulation of old data.
Step 3: Pull Products from Shopify
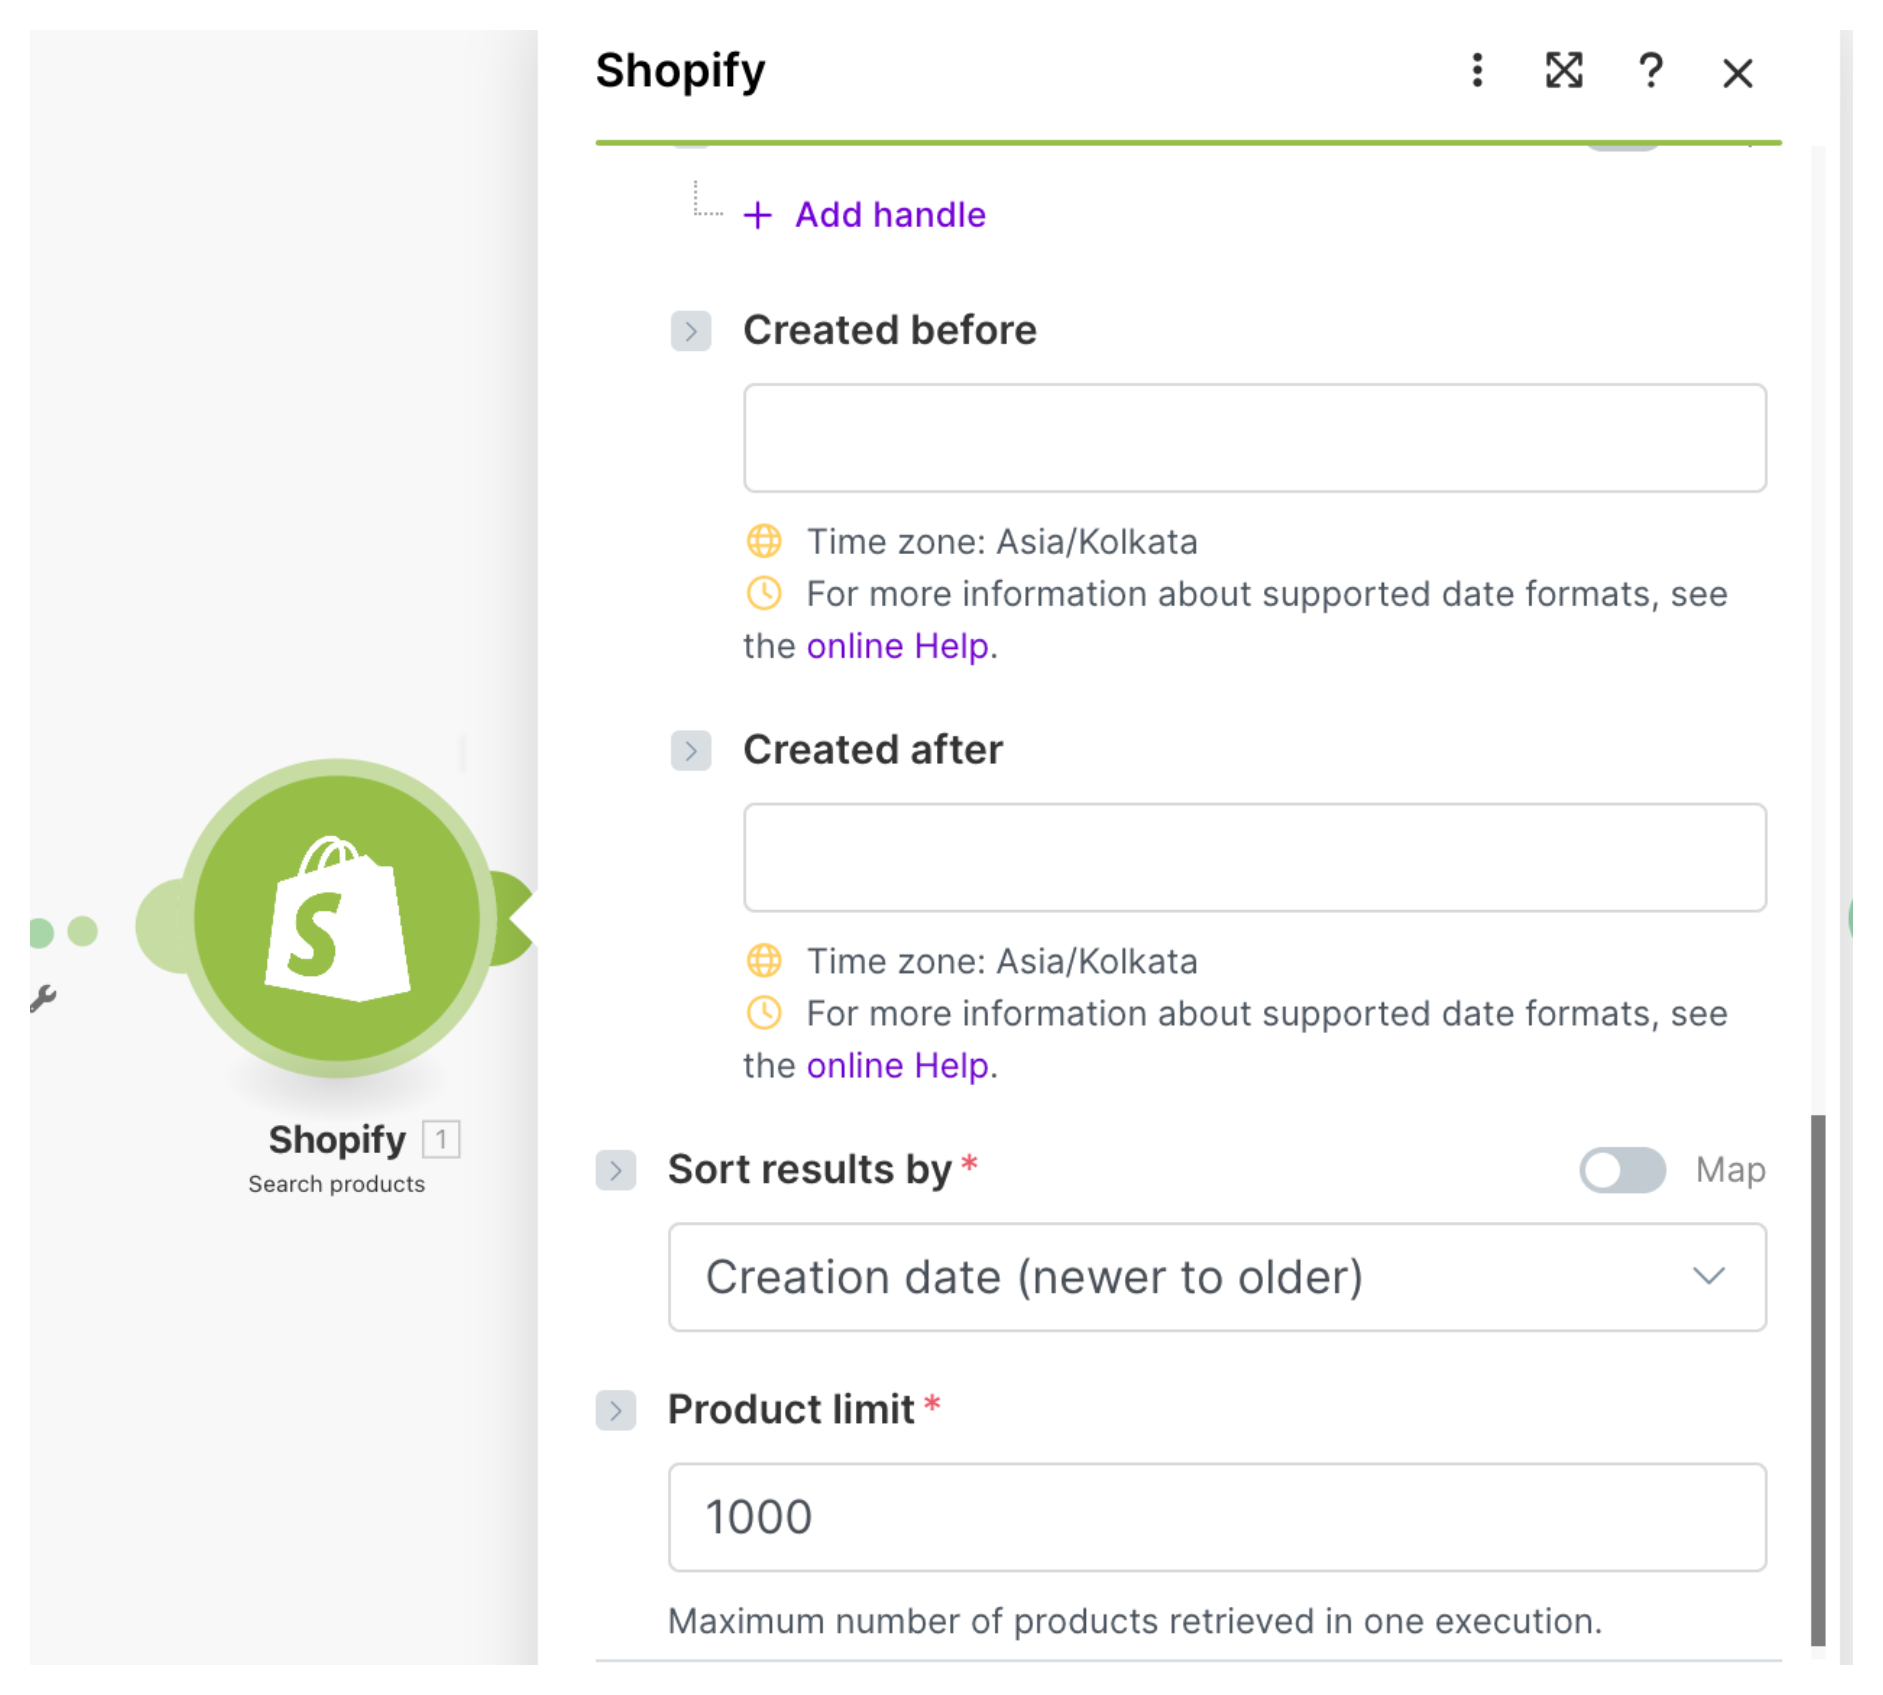
Add a second module: Shopify > Search Products.
Connect your Shopify store by authenticating through Make. In the module settings, set it to return all products. Depending on your catalog size, you may need to set a limit and use pagination, but for most stores, leaving the default covers everything.
This module returns a list of products. Each product can have multiple variants (different sizes, colours, materials), so the next step is to loop through both layers.
Step 4: Loop Through Products with an Iterator
Add an Iterator module immediately after the Shopify Search Products module.
Set the input array to the products array returned by the previous module. The iterator processes one product at a time, passing it to the next module in the chain.
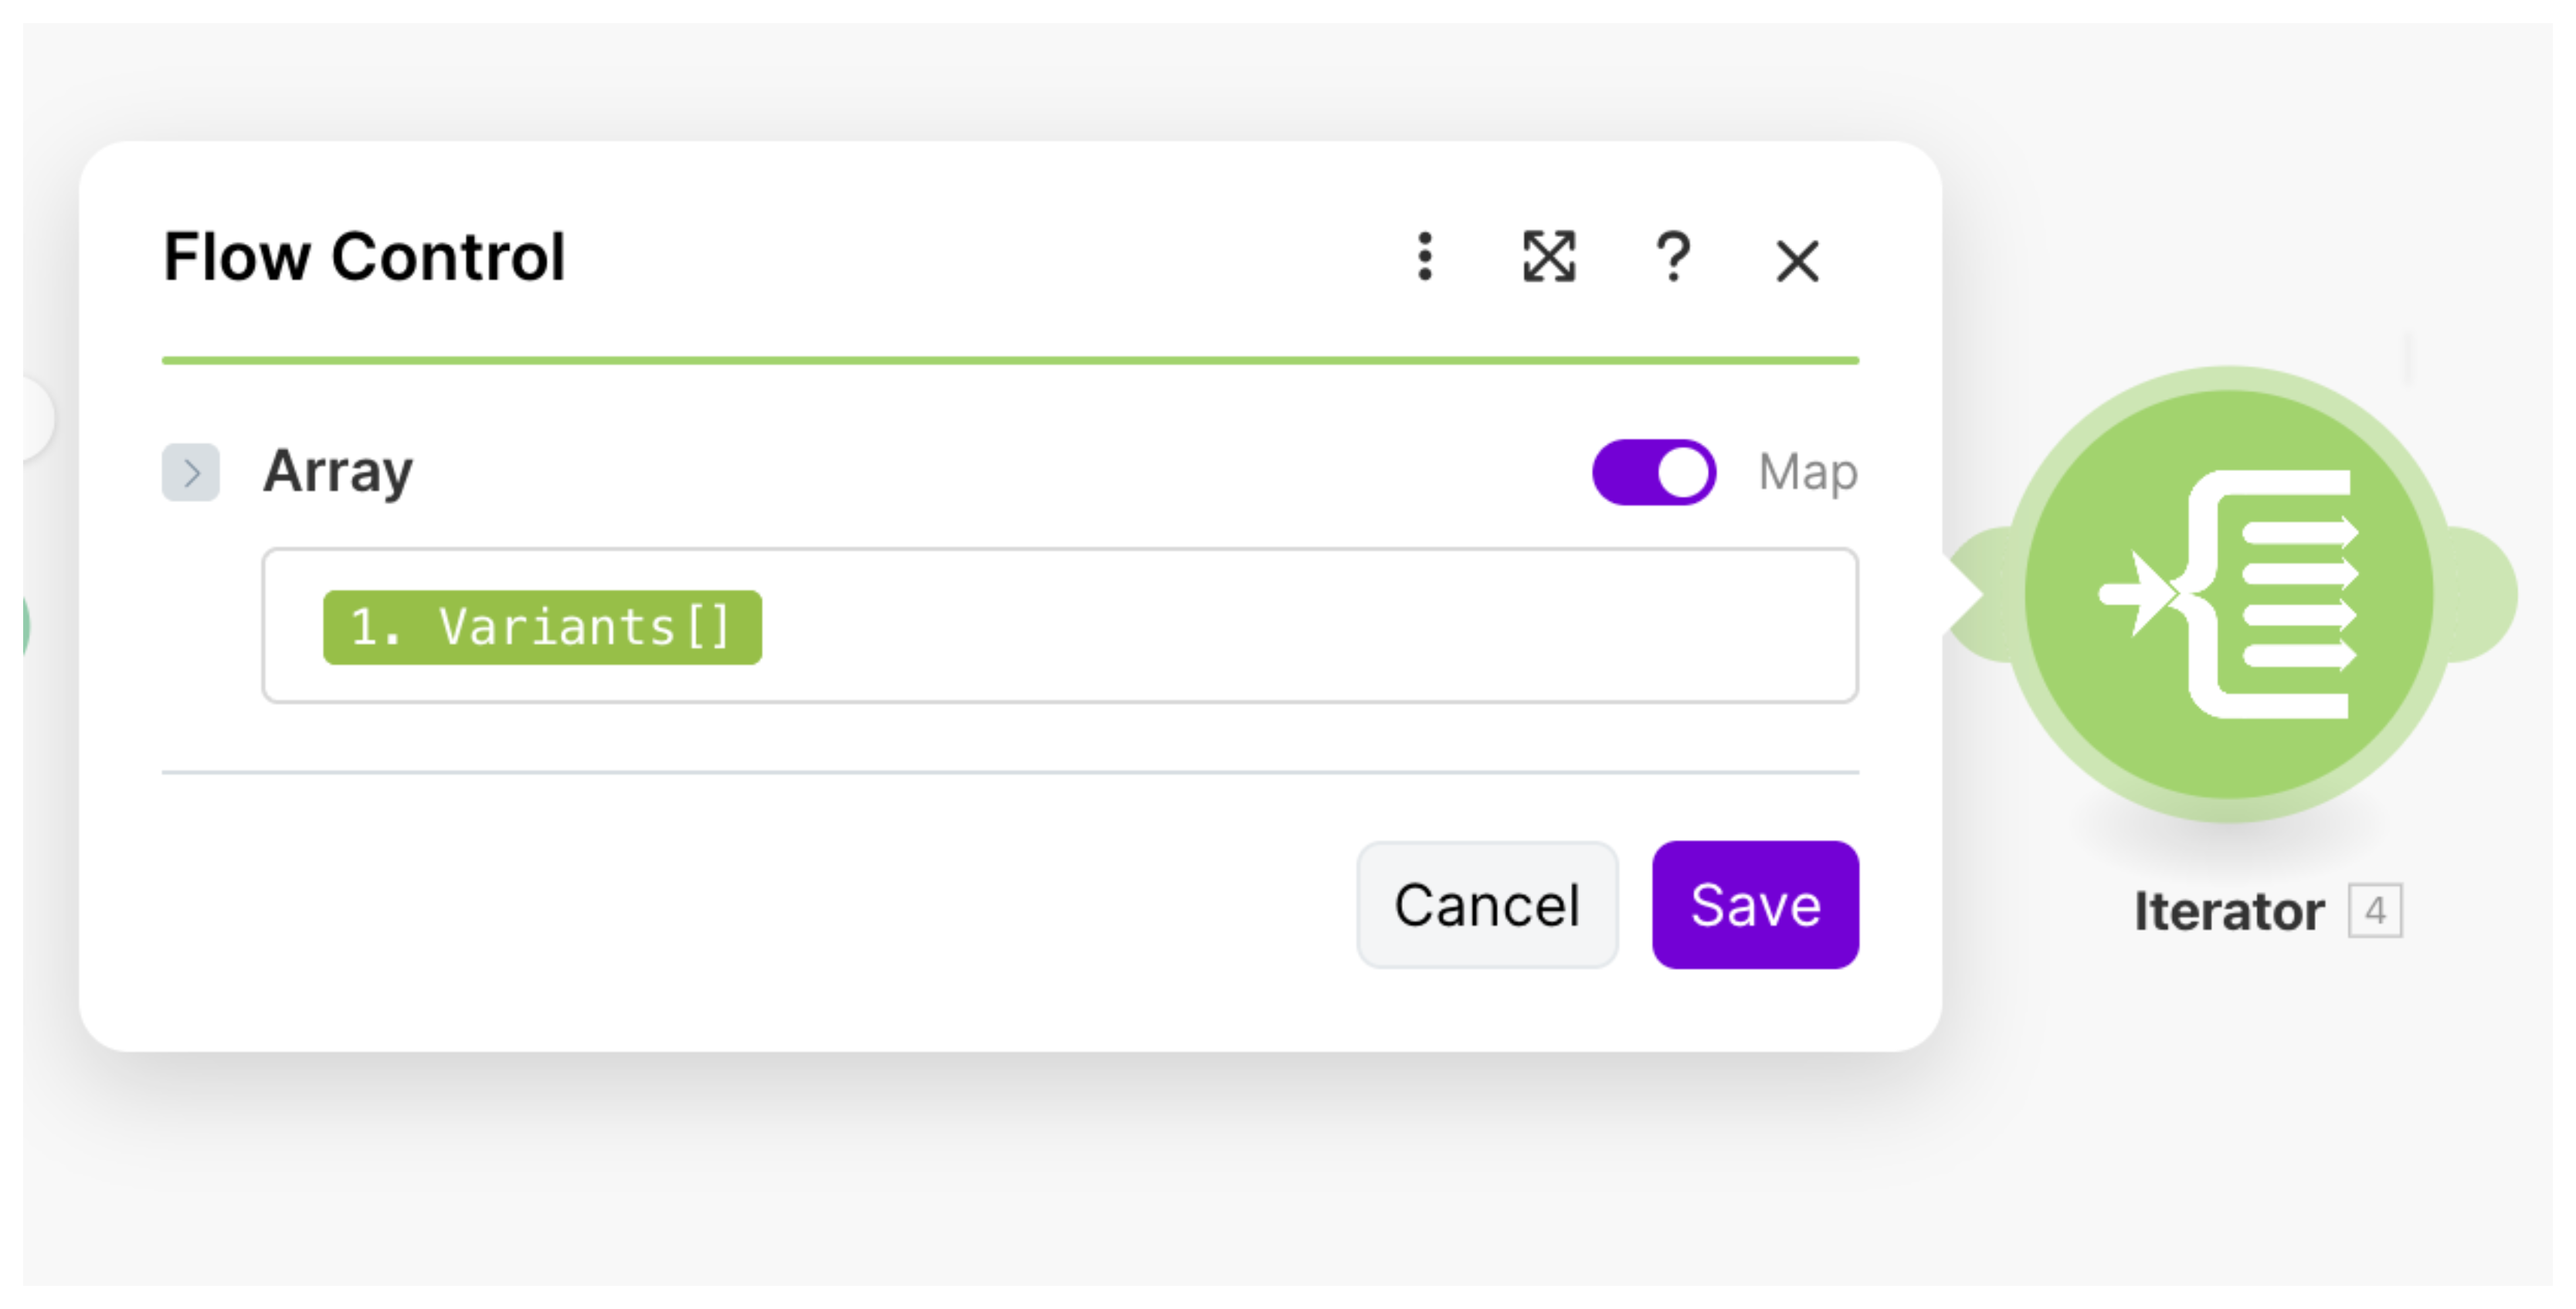
Step 5: Loop Through Variants with a Second Iterator
Each Shopify product contains a variants array. A t-shirt with three sizes has three variants, each with its own SKU and inventory count. You need a second Iterator to loop through these.
Add another Iterator module and point its input to the variants array from the previous iterator. Now for every product, the scenario will process each variant individually.
Step 6: Write Each Variant to Google Sheets
Add a Google Sheets > Add a Row module. Connect it to the same spreadsheet and sheet tab from Step 1.
Map each column to the corresponding Shopify field. In the module, you will see each column you named in your header row. Click into each one and select the matching value from the Shopify data:
Product Title →
titlefrom the product iteratorVariant Title →
titlefrom the variant iteratorSKU →
skufrom the variant iteratorPrice →
pricefrom the variant iteratorInventory Quantity →
inventory_quantityfrom the variant iterator
Each time the scenario loops through a variant, it writes a new row to the sheet.

Step 7: Set a Schedule
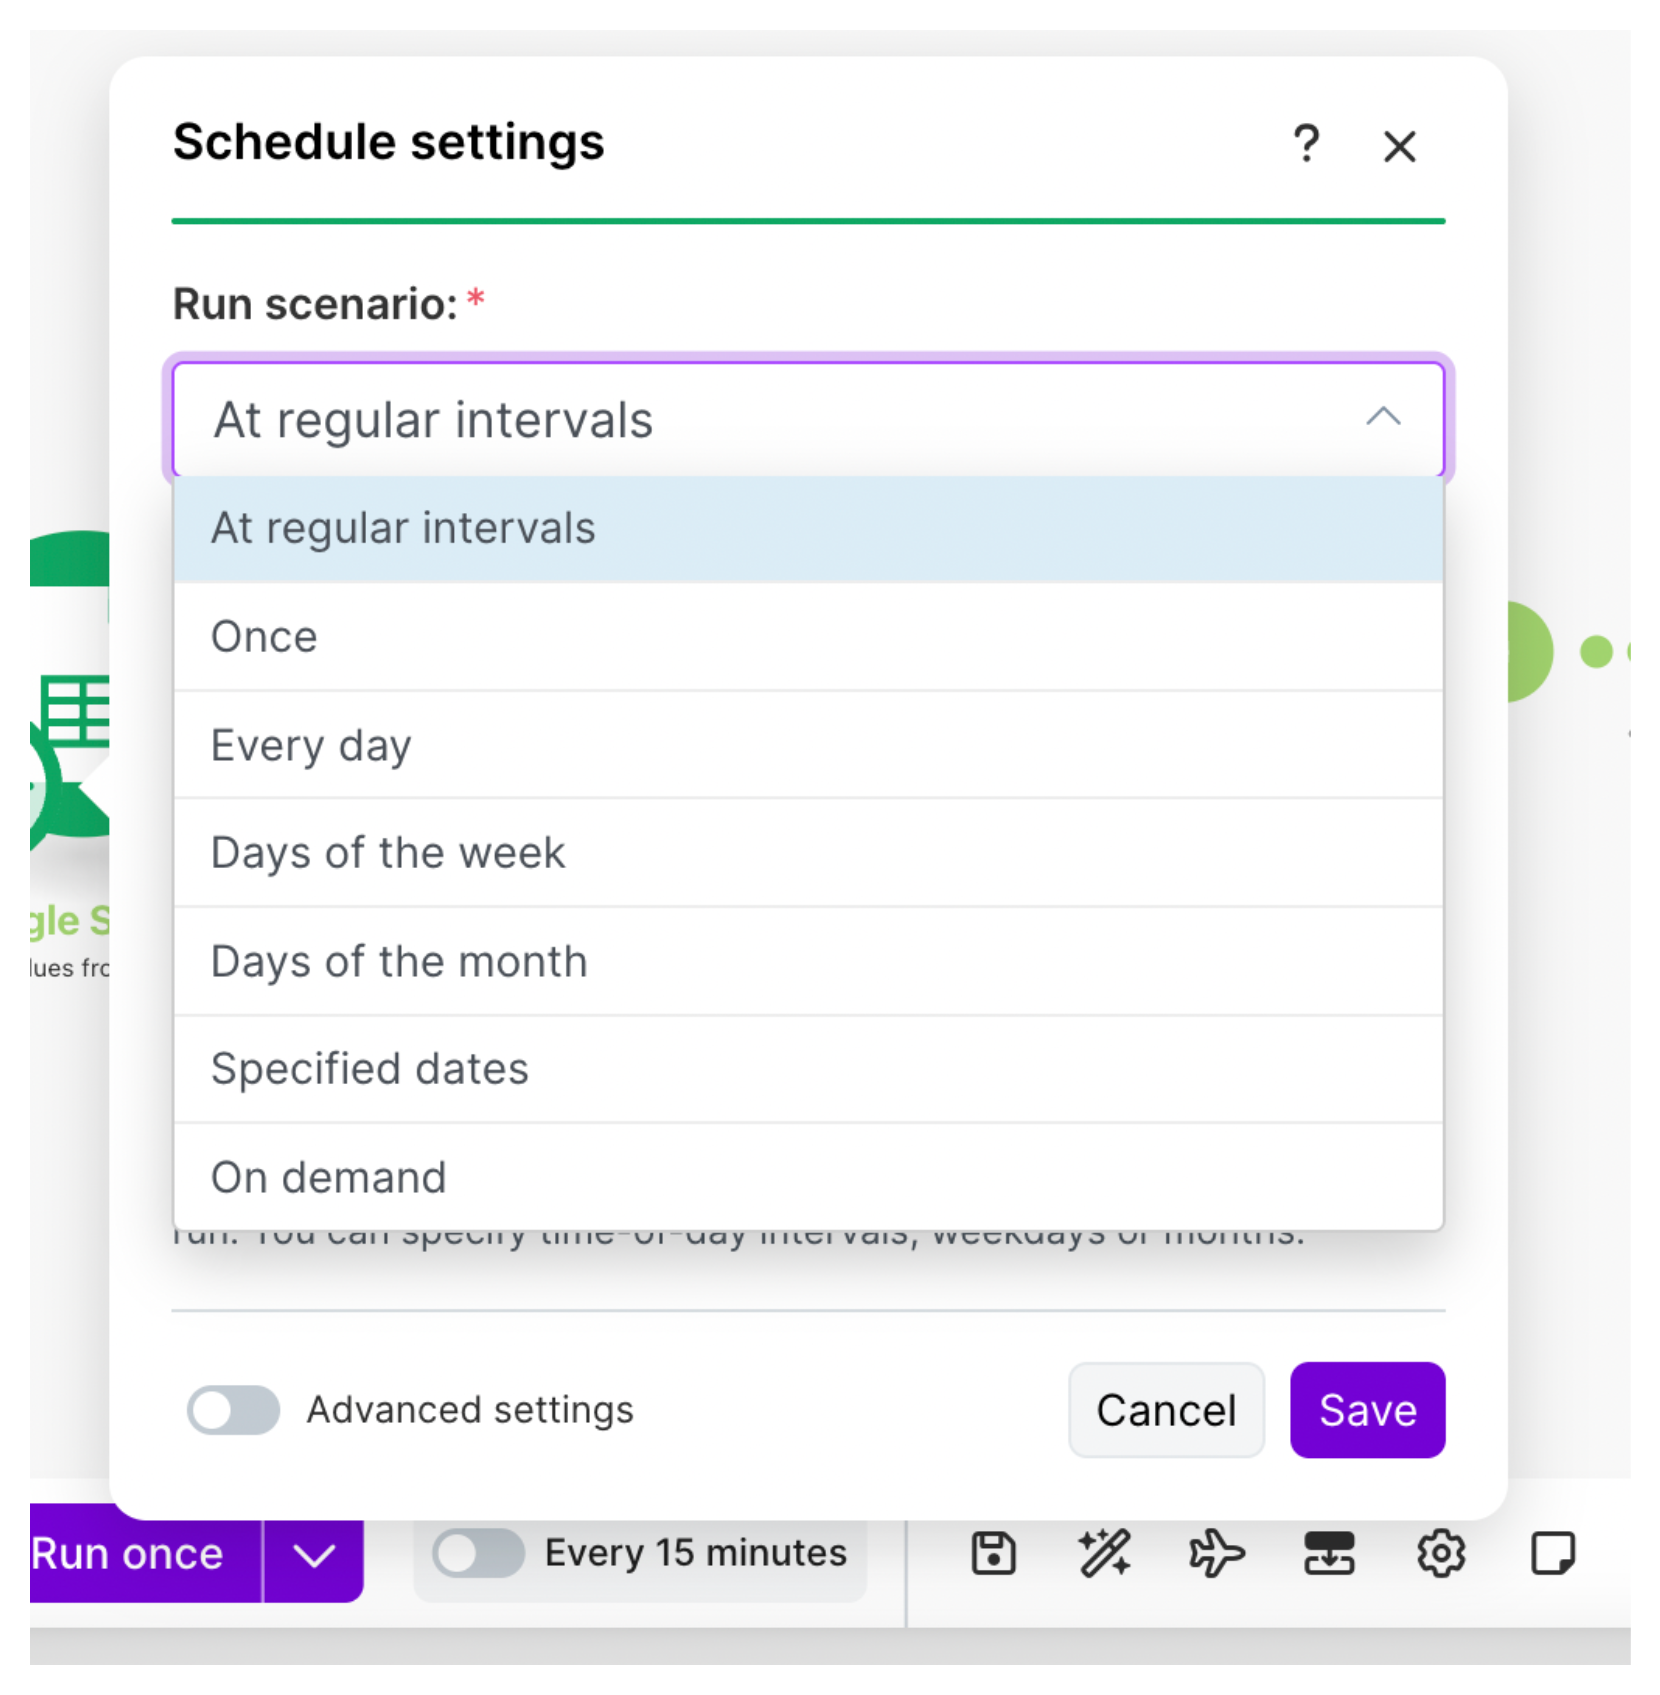
By default, Make scenarios run on demand. To make this automatic, click the clock icon at the bottom left of the scenario editor and set a schedule.
For most inventory use cases, once a day is enough. If you have fast-moving stock and need more current data, you can set it to every hour or every 15 minutes on a paid Make plan.
Once activated, the scenario runs in the background on its own. Your Google Sheet will always contain a fresh snapshot of your Shopify inventory without any manual work.
What Data You Can Pull from Shopify
The Shopify Search Products module returns most of what you need for inventory tracking. Here is what is available at the product and variant level:
At the product level: title, product type, vendor, tags, status (active/draft/archived), created date, published date.
At the variant level: SKU, barcode, price, compare at price, weight, inventory quantity, inventory management setting, inventory policy, requires shipping, taxable. If you want to update compare at prices across many products, pulling them into Sheets first gives you a clean way to edit values in bulk before reimporting via CSV.
Note that the inventory quantity pulled by the Search Products module reflects Available inventory only. It does not include Incoming quantities from open purchase orders or in-transit transfers.
If you need to cross-reference Available against Incoming for reorder planning, the article on how Shopify purchase orders, transfers, and incoming inventory work explains how to read those figures directly in your Shopify admin.
What is not directly available: location-specific inventory. If your store uses multiple locations in Shopify, the inventory_quantity returned by the Search Products module is the total across all locations. To get per-location inventory, you need to use the Shopify Get Inventory Level module separately, which adds complexity.
What About Connecting Shopify to Google Sheets the Other Way?
Some merchants want the connection to work in both directions: update a quantity in Google Sheets and have it reflect in Shopify automatically.
This is possible but significantly more complex. The general approach is:
- Set up a Google Apps Script or a Make scenario that watches for changes in the sheet
- When a specific cell changes, the script or scenario calls the Shopify API to update the inventory level for that SKU
The challenge is matching the right Shopify inventory item to the right row in the sheet, handling errors when SKUs do not match, and dealing with multi-location inventory. If you go this route, Make supports it through the Shopify > Update Inventory Level module, but you will need to store inventory item IDs in your sheet alongside the SKU to make the update call work correctly.
For most merchants, a one-way sync from Shopify to Sheets and then using Shopify admin directly for updates is simpler and less error-prone.
Alternatives to Make
Make is the most flexible no-code option for this, but there are others worth knowing about:
Zapier supports a similar Shopify to Google Sheets connection. It is simpler to set up but less powerful for handling product arrays and variant loops. Better suited for simpler syncs like new orders to a sheet rather than full inventory.
Coupler.io is a dedicated data connector that has a native Shopify to Google Sheets integration. It is closer to a one-click setup and does not require building a scenario manually. Good option if you just want inventory data in Sheets without configuring modules.
Google Sheets Shopify apps from the Shopify App Store exist but vary in quality. Search for "Google Sheets sync" in the App Store and check reviews carefully. Some are well-maintained, others are abandoned.
Shopify's built-in CSV export plus a scheduled import into Sheets using Google Apps Script is also viable if you are comfortable with a small amount of scripting. It is free and does not depend on a third-party tool, but requires occasional maintenance.
Troubleshooting Common Issues
The sheet is not clearing before new data is added. Make sure the Clear Values module runs before the Search Products module in your scenario, not after. The order of modules in Make determines the order of execution.
Variants are not appearing as separate rows. Check that you have added both Iterator modules, one for products and one for variants. Without the second iterator, each product writes only one row regardless of how many variants it has.
Inventory quantities look wrong. If your store uses multiple locations, the total quantity may not match what you see in Shopify's location-specific inventory view. Use the Get Inventory Level module per location if you need location-specific data.
The scenario fails after a few hundred products. Make has operation limits per month on its free plan. A catalog of 500 products with 3 variants each is 1,500 row-write operations per sync. If you run daily, that is roughly 45,000 operations per month, which exceeds the free plan. Upgrade to a paid plan or reduce sync frequency.
Once it is running, this setup gives you a live, always-current view of your Shopify inventory inside Google Sheets with no manual work involved.